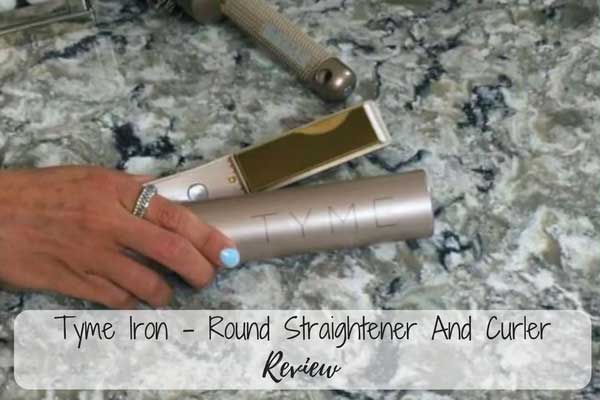
There’s a new hot tools kid on the block which promises unreal salon-results in the comfort of your own home. So we felt we had to do what we always do and conduct a thorough investigation! It’s called the Tyme Iron - a flat iron that curls and straightens.
Firstly, it’s important to understand exactly what it is and what it does. Well, it promises any style you want in minutes (ten minutes for medium thickness, mid-length hair) so that means if you want straight hair or curls you can do it all with one, easy piece of equipment.
It looks a little like a hair straightener but it’s thicker and has a rounded barrel so it’s engineered to create tiny ringlets, big curls, loose beachy waves or poker straight hair. That makes it a round flat iron that curls and straightens. Genius – but does it work? How does it compare with other straightener and curler 2 in 1 models? Read on to find out more.
Tyme Iron Review: Key Features
- Gold-Plated Titanium plates, these lock in hydration and prevent damage to hair as long as heat is administered carefully and the right protection is in place.
- Ionic technology which is excellent for getting rid of frizz and fly away and delivers shiny, smooth and silky-looking hair.
- High heat of 400 Degrees F with protective coating so provided you use the right heat-protection spray (see below for more on this) you shouldn’t burn your hair.
- Rotating swivel cord meaning you can easily reach the back of your head.
- Virtual styling advice on the Tyme Iron website and lots of video information online.
- One year manufacturer’s warranty.
- Heated sleeve which enables you to slip your Tyme Iron inside after use. No need to wait for your tool to cool down either. This sleeve is protective too, helping to prevent build-up of dust or risk of damage.
What is the Tyme Iron?
For those of you unfamiliar with what a Tyme Iron is, it’s a great little innovation. Essentially, it’s a flat iron but it curls and straightens hair, giving you a two-in-one product that is entirely flexible. It’s also fast, faster than any other hair tool on the market. Once you come to grips with how to use it, styling hair should take as little as 10 minutes for mid-thickness, mid-length hair.
What Does The Tyme Iron Look Like?
The Tyme Iron resembles a hair straightener but it is a bigger tool with a rounded barrel. The rounded barrel is there to create curls, whether they’re big, bouncy curls, loose, beach-style waves or little ringlets. The iron can also straighten hair.
How Hot Does it Get?
The Tyme Iron only has one temperature setting which is a downside, and that is 230 degrees celsius. This is not a variable setting, so beware and make sure to always use a heat protecting spray before using it.
Will it Damage My Hair?
Used properly, the Tyme Iron won’t damage your hair, however, you must be careful to use the right heat protection and never hold the iron on your hair for a long time. You should glide the iron through your hair without too much tension. As it has only one temperature setting, it’s probably not good for fine, damaged, colored hair because this type of hair tends to be brittle or prone to splitting and breakage. We would advise to avoid the Tyme altogether if your hair is any of the above.
What Hair Types Should Use The Tyme Iron?
The iron is best for thick, course hair or very curly hair that needs smoothing out. Medium thickness hair is also suitable as long as the right heat protection is in place. Avoid fine, brittle, broken or colored hair with the Tyme iron.
Before investing in a Tyme Iron, it’s worth understanding if it’s right for your hair type and also what the advantages and disadvantages are.
Tyme Iron Positives
- It’s a good looking hair tool and the Rose Gold color is very modern. Design is sleek and up-to-date so if you like attractive hair tools, this one will be right at home on your dressing table!
- It heats up very quickly, which saves time, especially when you’re in a hurry.
- It works fast, once you get used to using it!
- It’s gentle on the wrist because of its shape, there’s no need to strain.
- The Tyme Iron is excellent for thick, course hair and does straighten and smooth very quickly.
- There are no fiddly controls to deal with, just an easy-to-use on and off button.
Tyme Iron Negatives
- It’s a more expensive investment, but it’s worth mentioning that if you want a hair curler and a hair straightener, you get two-in-one so you avoid purchasing two separate tools.
- It’s not entirely easy to use and there is some learning to cover before you get the most out of this hair tool. However, once you do get used to it, you will enjoy the results.
- The iron only has one temperature setting which is too high for damaged, colored or fine hair.
- There is no auto shut-off, so you need to be very careful not to leave it on when your finished.
Styling Combo: Tyme Paddle Brush Plus The Upstaged Thermal Heat Protectant
Now, while you can use any added styling aid if you want to, the manufacturer recommends using their own brand of heat protectant and specially designed paddle brush to achieve the best results. The heat protector is called Upstaged Thermal Heat Protectant. The spray comes in a handsome gold bottle which delivers 120ml of product and you place a few drops into the palm of your hand, spread around your hair then use your Tyme Iron.
This product helps to deliver extra volume and shine as well as protect your hair from the high heat. In fact it’s so good, it keeps hair protected from hair styling tools up to 572 degrees F so you can use it with other styling tools as well. It also has a remarkably delightful scent so hair smells gorgeous.
As well as the heat protectant, the Tyme Paddle Brush is another must-have. The paddle brush promises tangle-free hair brushing and smooth, soft, shiny hair. It includes a few excellent added features such as a very comfortable grip with non-slip technology and a clever magnetic feature so you can attach it to any metal surface (saves you hunting down your brush when you want to style your hair). It’s also fine to use on any hair type, whether it’s thin, medium thickness, thick, curly or straight.
How to use the Tyme Iron
If you’ve already got your Tyme Iron you’ll be excited to use your new round straightener and curler product but as with anything new, it takes a little time to get to grips with it. However, we’ve done the work for you and here are some of our great tips to get the most out of your new hairstyling tool.
BASIC GUIDELINE FOR CURLING
- First, start with dry hair. Wash and condition it as normal, rinse out thoroughly, towel dry and apply the Upstaged Protectant from Tyme Iron, then dry off your hair. You can use this product in-between washes to pep up your style too if you want to but never use it on wet hair.
- Now your hair is dry, we’d recommend sectioning out your hair so it’s easier to manage (you don’t have to do this but it helps).
- Your Tyme Iron looks like a V shape when you pick it up. This is normal, when you style it, it will close together to form a barrel shape.
- Switch on your Tyme Iron using the on/off switch inside the plates. The light will turn blue and this shows it’s working.
- To use it properly, hold your thumb over the blue light and turn it so it looks like a bike handle when closed, it should resemble a gold barrel, when you open it, you’ll see the brown guideline plates inside. This is how to hold your Tyme Iron.
- The brown lines are what you use to curl. The gold plates are what you use to straighten – you’ll notice this when you hold your Tyme Iron properly!
- When you use your Tyme Iron you turn your wrist toward the mirror (as if you’re revving a motorbike) this is how you style your hair.
- For curls, you use this wrist-action and move your arm forward toward the mirror as you style (never upward or outward).
- To style hair at the back, you pull it up and over your head using the wrist action mentioned.
- So, clamp the top of your section of hair between the Tyme Iron making sure your wrist is facing toward the mirror and then move the iron forward to near the end of your hair and release. That’s all you need to do to create a beach wave.
- Remember to glide the iron through your hair rather than rushing the movement, if you rush it, you won’t achieve the curl you want. This also gives your hair more curl and gets rid of the frizz – it’s not a traditional straightener so has to be used slowly but must move through the hair at an even pace so not to burn it either.
- For tighter curls, move the Tyme Iron slowly, for looser curls, move it faster – you’ll work out the speed according to the curl you want to achieve. If your curl is too tight, you can loosen it by combing through using a wide tooth comb or using your fingers to separate curls.
- Styling the left hand side of your hair uses the same technique except move your right hand (the one holding the iron) over the top of your head, then take the section and place it into the iron, flipping hair over the back of the iron. Keep the wrist facing the mirror and move your arm forward toward the mirror (sounds complicated but it isn’t when you get used to it!).
- If you have fine hair, don’t comb your hair out after curling, wait for the curl to set.
- Don’t use too much tension; there is no need to squeeze the plates too tightly together. If you do squeeze too tightly you will get kinks in your hair, this is more noticeable on fine hair so be gentle when using the Tyme Iron.
- For fine hair, section hair vertically and don’t use too much hair at a time, you’ll get a much better result
If you’re styling someone else’s hair, you need to change your hand position and put your thumb over the Tyme area rather than the blue light. The motion you use is the same, you’ve just reversed your hand position to style someone else’s hair. - Remember to switch it off when you’re finished.
BASIC GUIDELINE FOR STRAIGHTENING
Start with dry hair, whether it’s freshly washed and rough-dried or you’re using in-between styling
Always use heat protectant before styling!
Use the gold plates to guide you and using a simple action just glide hair through in one direction.
So, no need to watch the brown guidelines, watch the gold plates.
Take a section of hair, place the root of the section between the gold plates and slowly glide the Tyme Iron through the hair to the base without using too much tension.
BASIC GUIDELINE RINGLETS TO SMOOTH CURLS
The Tyme Iron even works to transform very tight curls into smoother, softer curls – here’s how to achieve the look, even with type 3 very tight ringlets you can do it!
- Again, start with freshly washed and conditioned hair.
- Towel dry and apply Upstaged, the Tyme Iron heat protectant.
- Dry off hair and section it out.
- Plug in your Tyme Iron, switch on the blue light.
- Hold your thumb over the blue light.
- Put your wrist into position (like you’re revving a motorbike, wrist always facing the mirror).
- Place hair inside the iron and wrap the rest of hair around the body of the barrel.
- Gently glide hair forward toward the mirror without too much tension, use your other hand to hold the hair that’s outside the iron as you glide the iron through.
- Release your smooth, shiny curl.
- Repeat all over the head, making sure to lift the hair at the back of your head up and over your head and move your arm over your head to the other side rather than alongside your head.
Styling Someone Else’s Hair
Of course, you might want to style someone else’s hair with the Tyme Iron, in which case, to achieve straight hair, use it like a traditional straightener, but for curls you need to adjust your hand position and put your thumb on the “Tyme” rather than on top of the blue light. Use the same motion (moving toward a mirror) the only change is that you’ve reversed your hand position. Remember, this isn’t a very easy tool to learn and styling it on someone else’s hair really does help to understand how it works and to get the best results.
Tyme Iron Alternatives
Is there anything else out there similar to the Tyme Iron? The answer is yes, the InStyler Max which is another innovation that’s good for curling and straightening hair. It doesn’t operate the same way as the Tyme Iron, but it achieves the same results. The InStyler Max also has four heat settings so it’s better for fine hair as you can adjust the temperature and with two barrel sizes you can achieve different size curls.
Instyler Max Similarities
- Curls and straightens.
- Can create different size curls.
Instyler Max Differences
- More heat settings.
- Is not a traditional straightener, it is a rotating barrel.
- Far easier to learn than the Tyme Iron!
Tyme Iron vs Beachwaver
The Beachwaver by Sarah Potempa is an excellent curling iron but it is different to the Tyme Iron as it does not straighten. It also has fast and slow speed controls so you can easily operate it and it creates structured, loose, beachy or large curls. It’s definitely far easier to use and unlike the Tyme Iron, it is suitable for most hair types.
Tyme vs CHI
In all honesty, you can create the same finish with the Chi straightening irons which continue to be one of the best hair tools you can buy at the moment. They are the gold standard and offer excellent temperature control so there’s no chance of burning hair if used properly. Excellent for straight hair and for curls, the plates stay consistent, heating up evenly without hot spots. Far easier to use than the Tyme Iron, we would recommend trying these out.
Tyme vs GHD
GHD are still the best when it comes to straightening tools and they definitely get hair nice and sleek, without the frizz but they aren’t as good when it comes to curling because they don’t feature a rounded end. That means that you can create curls however, they normally have a bend in them so don’t look soft and natural. A pro can get curls out of a GHD straightener but for those of you who want curls at home and to be able to straighten hair too, the Tyme Iron should be a better
Tyme vs Babyliss
The Babyliss Curl Secret is an excellent tool – once you learn how to use it! It’s only for curls (hence its name) and uses a chamber that twists hair into curls. You place hair inside, set the timer and it releases curls. It is good, probably easier to use than the Tyme and suitable for all hair types, but hair sometimes snags it and gets caught inside the chamber. Once you get used to it, the Tyme Iron is a better hair tool, especially as it curls and straightens hair.
That’s everything you need to know to use your new Tyme Iron – it's a bit tricky to handle, but once you've mastered the art of using it, the end result is quite impressive!





Susan says
Wow! I wish I had found this site BEFORE purchasing a Tyme Iron! I already had an Instyler and LOVED it for straightening my hair; but then I bought a Tyme Iron because I wanted to occasionally have those awesome ringlets or "beachy" curls I see on some people. It never occurred to me to even TRY that look with an Instyler. However, when my Tyme Iron arrived, I discovered that the learning curve - which is apparently pretty steep for that particular hairstyling tool as it is - is even steeper for lefties. And I'm a lefty. It's so tiresome sometimes living in a right-handed world. When I googled "left handed Tyme videos" I either had to watch right-handed people trying to stumble their way through using it with their left hand OR lefties trying to persuade me to try using it with my right hand. Sorry...not happening. I'm a lefty and if I buy a tool I expect to be able to use it with my dominant hand. If that's not possible, then I'll pass on it until the inventors make one for lefties. After reading your review comparing the Tyme to the Instyler, I googled some videos. Then I tried my Instyler - which is SO SIMPLE to use already - this time to create those ringlets I've been longing for - and voila! Success! Even for a lefty like me! And no need to set aside an entire afternoon to learn how to do it! Amazing. Now I can stop giving myself migraines watching right-handed hair videos! THANK YOU!!! I should have known my Instyler would come through for me. I've had it for years and it's never failed me yet. The Instyler rocks.
Marilyn Morey says
Isn’t this a frustrating device. I’ve watched 6 videos on how to use it and I still can’t figure out how to use it.